DESIGN SMARTER: DFM in 3D Printing: Essential Tips and Principles
- Zakaria EL MLILAH
- Sep 16, 2025
- 6 min read

Updated: Oct 10, 2025
So, 3D printing opens up a world of possibilities, from rapid prototyping to small-batch production. But just because you can model something doesn’t mean it’s ready for the printer. That’s where Design for Manufacturing (DFM) comes in.
DFM for 3D printing is all about creating designs that are not only functional and beautiful, but actually printable. I mean hello we can design anything we imagine (almost), but can we print it? that's why we need to think about how it will be built before we design it.
So, In this post, we’ll cover design considerations for modeling better 3D printed parts, avoiding costly mistakes, and getting prints right the first time.
What is 3D Printing?
Definition of 3DP
3D printing is an additive manufacturing process for making three-dimensional solid objects from a digital model (CAD file).
In simple words, it's like the traditional printer we know, but instead of printing a shape on a paper, we print it on a surface (printer bed).
How Does It Work?
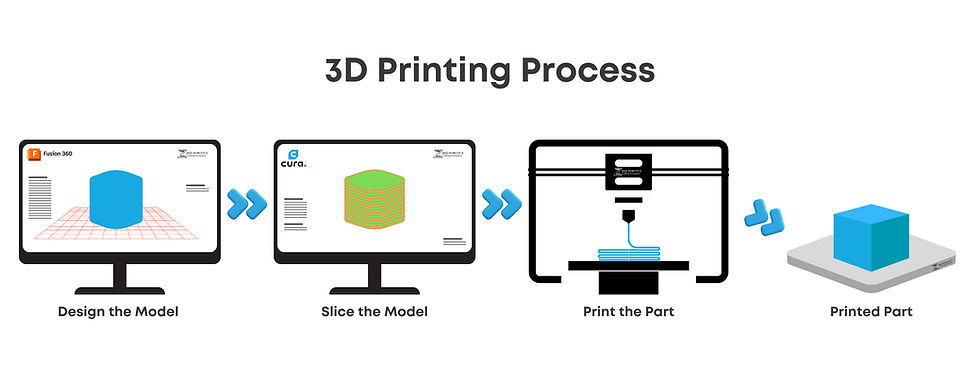
The working principle is simple.
Design the Model: You create a 3D model using CAD software, like CATIA, Fusion360 , SolidWorks....
Slice the Model – You move the model to another software called Slicer which slices it into thin horizontal layers, like Cura or PrusaSlicer. This software generates a gcode file that contains instructions on how to build the model.
Print the Part – You send the Slicing file to the 3D printer that follows the sliced instructions (Coordinations, speed and temperature settings, ...) and prints layer by layer until the object is complete.
Common 3D Printing Technologies

There are many types of 3D printing technologies, the most common ones are:
FDM (Fused Deposition Modeling): Melts plastic filament and lays it down layer by layer. The most common type and it's great for prototypes and everyday parts.
SLA (Stereolithography): Uses light to cure liquid resin. High resolution and smooth surfaces. Best used for miniatures.
SLS (Selective Laser Sintering): Uses lasers to fuse powdered materials. Strong parts, no supports needed. Used mostly in industrial applications...
Why is it Popular?
Fast Prototyping – Go from idea to object in hours
Cost-Effective – No need for expensive tooling or setups...
Customizable – Each part can be unique and easily modifiable. Flexibility.
Accessible – Printers are affordable (price varies of course).
What Can You Print?
Prototypes
Replacement parts
Tools and jigs
Artistic models and figurines
Functional components (even in aerospace and medical)
Design Considerations for 3D Printing
Let's talk about some important tips to consider when you want to design something and planning to print it.
1. Wall Thickness & Structural Integrity

Varying wall thicknesses can create weak spots in a design, making it crucial to maintain consistency throughout your part. it influences:
Print success rate, Strength, Material usage and Surface quality
Recommended Minimums (per process):
Process | Min Wall Thickness | Notes |
FDM | 0.8–1.0 mm | Depends on nozzle size. higher for tall or thin parts |
SLA | 0.4–0.6 mm | More delicate but highly detailed |
SLS | 1.0–1.5 mm | Stronger but needs uniformity to avoid curling |
Pro Tip: Gradually transition between thin and thick regions to avoid warping. instead of having a 1mm thick wall and suddenly jump to a 5mm wall thickness, it's recommended to smoothly taper or fillet the geometry, this helps better distribute the heat and allowing better material flow.
2. Overhangs, Supports & Bridging
Overhangs are features that hang in mid-air. If they're too steep, gravity pulls them down during printing.

Overhang limit: Most printers handle up to 45° without supports.
Bridges: Can span short gaps but need fan cooling and tuning.
Supports: Increase print time, material use, and post-processing work.
Pro Tip: Avoid designing 90° sharp overhangs by using a 45° chamfer. That way you won't need a support to handle it. You can also break the model into parts to avoid complex supports. If you can make one face of the model flat, it's very helpful
3. Tolerances, Fits & Functional Features
Unlike CNC or injection molding, 3DP has more dimensional variation—especially with FDM.
Feature Type | Recommended Clearance / Adjustment |
Snap fits | 0.3 – 0.5 mm |
Sliding fits | 0.5 – 1.0 mm |
Hole–shaft | Add ~0.2 mm to hole diameter |
Pro Tip: Always test tolerances with calibration parts before final production. For example, if you are designing a gearbox and you have doubts about the ball bearings housings, instead of printing the whole part and reprint it again if it's not well dimensioned, just cut the part that includes the bearing housing and print it, if the tolerance is right, apply same tolerance for all bearings housings in the design.
4. Orientation & Anisotropy

The orientation of a part during printing can affect its overall performance. Parts printed vertically versus horizontally display different properties entirely.
For example, if you have a thin, elongated part, printing it horizontally might yield better strength. A component like a bracket needs to support weight, so knowing that it will perform better in a horizontal stance can drive better design decisions.
5. Thermal Warping & Shrinkage
As layers cool, they shrink. Uneven cooling leads to:
Warping
Curling
Cracking (in large, flat parts)
Pay attention to:
Material choice: ABS warps more than PLA or PETG
Bed adhesion: Use brims, rafts, heated beds
Cooling settings: Balance fans to avoid cracking
6. Surface Quality & Post-Processing
Layer lines, blobs, zits, ... these surface defects are common in 3DP.
Design implications:
Avoid critical aesthetics on vertical walls
Smooth curves > sharp edges
Use fillets instead of 90° corners
Post-processing options:
Sanding
Vapor smoothing (e.g., for ABS)
Painting & priming
Resin coating (for FDM)
7. Modular Design: Break it into Parts
Larger or complex parts often fail due to:
Warping
Printer size limits
Over-supporting
Best practice: Split your model into smaller printable modules:
Easier to orient
Stronger parts
Better surface finish
Use dovetail joints, snap fits, or screw bosses for assembling afterward.
8. Infill Patterns & Shells
You don’t need to print everything solid!
Infill % affects weight, strength, time, cost
10–20% for prototypes
30–50% for functional use
100% only for max strength
Combine infill with outer shell count:
2–4 perimeters = better strength + impact resistance
9. Build Volume & Printer Constraints
Before finalizing a design:
Check max printable size for your target printer
Consider nozzle diameter, layer height, and filament type
Bed adhesion methods (brims, skirts)
Print time – does your design take 30 mins or 12 hours?
Final Checklist for DFM in 3DP
Wall thickness within printer limits
Overhangs < 45° or supported
Proper tolerances applied
Load-bearing parts oriented correctly
Minimal warping strategies in place
Infill & shells optimized
Model fits printer build volume
FAQs
What is a safe bridge length on a typical desktop printer?
15–20 mm is usually clean with PLA and proper bridge tuning; longer spans are possible but expect some sag.
How much clearance for a friction fit?
Start at ~0.3 mm for a snug snap fit and 0.5–1.0 mm for sliding fits; tune with a test coupon.
Why do my overhangs look rough even at 45°?
Perimeter speed may be too high or cooling too low. Slow to ~20 mm/s and increase fan (PLA).
Should I print threads?
For light duty, fine. For durability, use heat‑set or threaded inserts.
What matters more for strength, infill or perimeters?
Perimeters often add more real‑world strength than more infill—especially for bending.
In Summary

3D printing enables creativity in ways traditional manufacturing cannot. Don't shy away from exploring unconventional designs. A striking example is the design of complex geometries found in aerospace applications, which not only showcase creativity but also optimize weight and strength.
However, make sure your innovative designs can be produced effectively without straining resources.
Designing for 3D printing isn't just about making something printable—it's about engineering it right. When you consider machine constraints, material behaviour, and end-use, you can create parts that are:
Strong
Efficient
Easy to print
Aesthetically sound
Ready to bring your design to life?
At ZEED Robotics, we specialize in creating 3D models that are not only visually appealing but also optimized for smooth, reliable printing. Whether you need help with tolerances, support-free designs, or full prototype development, we’ve got you covered.
Start Your Project Today and turn your idea into reality.

Comments