DESIGN SMARTER: Practical Tips for Design for Molding
- Zakaria EL MLILAH
- Oct 1, 2025
- 3 min read

Updated: Oct 21, 2025
You can design the most beautiful CAD model, but if your part can't be molded efficiently it will never leave the screen. Here’s what I've learned to make sure our designs not only look good but also pop out of the Mold on the first try.
Understand the process
Injection molding isn't just "plastic goes in, part comes out." It's a set of cavities, cores, runners and gates that deliver molten material under pressure. Think about where your part will be fed, how the material will flow, and where the parting line should be. The earlier you think about these things, the fewer tooling headaches later.
Design tips for Molding
Uniform wall thickness
Keep your walls consistent wherever possible. Thick sections cool slowly and can cause sink marks or warping; thin sections may not fill completely. When you need transitions, taper gradually to avoid abrupt changes in thickness.
Using Draft angles is a must

Parts need to release from the mold. Add a little draft (usually 1–3 degrees) to any wall that pulls along the direction of the mold opening. The taller the wall or the more textured the surface, the more draft you should allow.
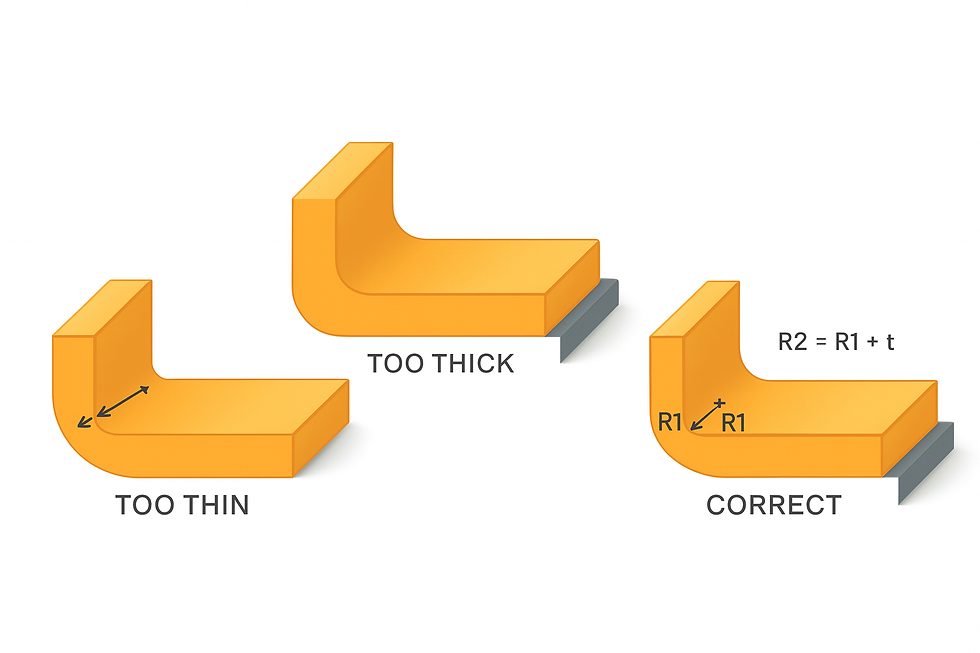
Fillets and chamfers

Sharp corners make for stressed parts and stressed mold-makers. Adding fillets to inside corners improves material flow and reduces stress concentrations. Radii also help the mold last longer by removing sharp edges on the tool.
Plan for undercuts and side actions
Undercuts add complexity and cost. Try to design your part without them, or if they are essential, plan the slides or lifters needed to release the part. Avoid surprises by discussing any potential undercuts with your mold maker early.
Mind the parting line

The parting line is the seam where the two halves of the tool meet. Place it in areas that are either hidden or easy to clean up. Avoid having cosmetic surfaces cross the parting line.
Material and finish
Not all plastics behave the same. ABS flows differently than nylon; glass-filled materials need larger radii and thicker walls. Choose the right material for your application and communicate it to your mold maker so they can adjust gating and cooling accordingly.
Material | Properties | Molding Considerations | Common Finishes | Applications |
ABS | Tough, impact resistant, easy to machine | Flows easily, moderate shrinkage | Glossy or matte, can be painted or plated | Consumer products, housings, enclosures |
Nylon | Strong, wear resistant, absorbs moisture | Needs drying before molding, can warp if unevenly cooled | Smooth, semi-gloss | Gears, mechanical parts, bearings |
Polycarbonate | Transparent, high impact resistance | Requires high temperature, sensitive to moisture | Polished for clarity | Optical parts, covers, safety gear |
Polypropylene | Flexible, chemical resistant, low cost | Shrinks more than ABS, requires draft for easy ejection | Textured, matte | Packaging, containers, automotive clips |
Glass-Filled Nylon | High stiffness, temperature resistant | Needs thicker walls and larger radii, wears tools faster | Matte or lightly textured | Structural components, brackets |
POM (Acetal) | Low friction, dimensionally stable | Good flow, minimal shrinkage | Glossy or smooth | Gears, precision parts, mechanical joints |
TPE / TPU | Rubber-like flexibility, good grip | Sensitive to cooling rate, needs smooth mold surface | Satin or matte | Seals, grips, overmolding |
Collaborate early and often
The best designs come from collaboration. Don’t wait until your CAD is "final" before talking to the mold maker. A five-minute chat can save weeks of revisions.
Need help turning your CAD idea into a mold-ready part? Let's talk.


Comments